Arudino UNO Q meets dotnet
TLDR; just want to try it
Go to my Reble.ArduinoRouter GitHub Repository and follow the instructions. You don’t need to install anything new on the Arduino UNO Q as everything we need is already installed (git, docker)
The Motivation
Arduino has a new home: Qualcomm! And thus Qualcomm has decided to bring out an Arduino which has not only a microcontroller (MCU) but also a CPU from Qualcomm (MPU) which runs a fully fledged Linux with python and docker installed. With it comes also a new built IDE from which you can build your microcontroller code in Arduino C++ and python scripts that run on the MPU. Those two can communicate via a so-called Arduino Router.
So you can for instance do some real-time analysis of a sensor in the MCU and send every 10ms or so the accumulated data of the sensor to the MPU which then implements an http server where you can have a fully fledged dashboard which is powered by the MPU. Furthermore there is also an integrated GPU in the MPU to leverage AI driven implementations, for example by interpreting accumulated data from the MCU. One example given by the Arduino IDE itself is a vibration anomaly detection which uses the MCU to get the raw sensor values, which sends the data to the backend running on the MPU which leverages the GPU to find anomalies in the vibration.
I am a dotnet developer by heart for many years. For me the travel started because I was in search of a high level programming language that works on a raspberry PIs. Lucky me: at that time dotnet core 1.0 was just released. Even though it was a little pain at the beginning I was amazed how that old, corporate-feeling .NET Framework emerged into a beautiful language which has set the standard for many other programming languages in the last ten years. With dotnet 10 it doesn’t matter if you are a Microsoft-lover, a Mac-fanboy or a linux-evangelist – you just code wherever and on which platform, for which platform you want.
So I wanted to know if we could use dotnet 10 to work with the Arduino UNO Q and in the first place replace python for the backend on the MPU.
Getting started
After I received the Arduino UNO Q by mail I opened it and plugged it into my USB-C charger for my mobile phone and hoped that it will open up a open WiFi hotspot where I can connect to. Unfortunately that is not how it works. So I did what every good developer does after trying to figure it out on my own: reading the documentation. I figured that I have to connect it via USB-C cable to my computer and then download and install the IDE. After I did the IDE told me that I should connect my Arduino UNO Q via USB-C – I did already, but the IDE was not able to find it. So I decided to install the new firmware first.
1. Update Firmware
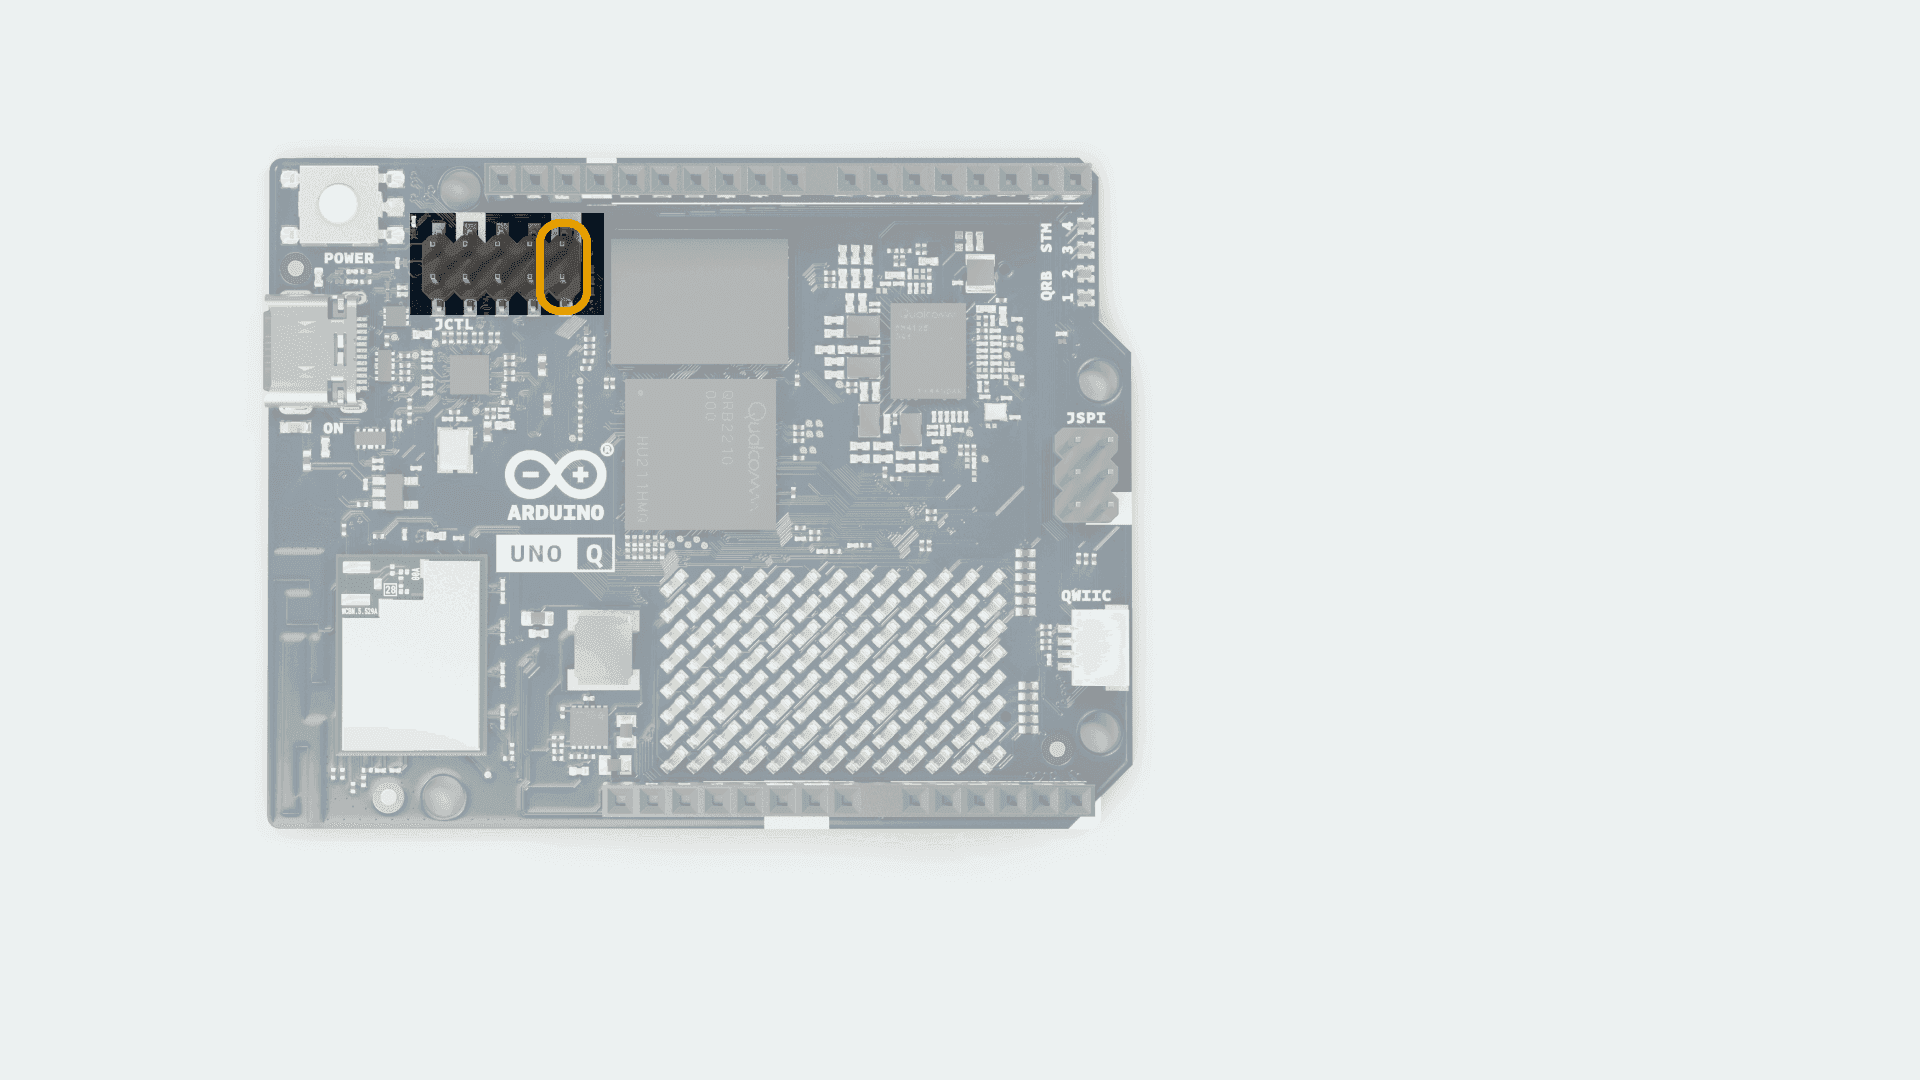
- Add female-to-female jumper to the both pins on the opposite side of the power button
- download cli firmware update tool
- run:
./arduino-flasher-cli flash latest- when finished disconnect from USB-C and remove the jumper
2. Install IDE
- download and install Arduino App Lab
- Plug UNO Q (without jumper) via USB-C
- Start App Lab and select the Arduino
- Go through your installation process. The Password you set will be later used to connect via ssh to the UNO Q.
3. Run first example
After update and installation process has completed you can run your first example. For understanding how the Arduino Bridge works I think a good start is the Blink LED with UI. You can select it via the App Lab, run it, and follow the instructions.
Coding with dotnet
We have many different ways how to develop with dotnet on the Uno Q. I for my self use JetBrains Rider for developing. In Rider you have the possibility to use remote debugging, but you can do it with Visual Studio or VSCode, too.
1. Setting up UNO Q
To be able to run dotnet applications on the UNO Q we have multiple ways of doing so. One would be to compile it as self-contained, which has the drawback that we would have to copy a lot of files everytime we develop. Another would be native AOT compiling or develop in a docker container that has it own drawbacks. So I decided to install the dotnet aspnetcore runtime (you don’t need the full SDK as we will compile on our development computer)
Connect to UNO Q via SSH
ssh arduino@<boardname>.local #replace <boardname> with your board nameType yes when prompted to, and use the password you set up in your App Lab
Install dotnet runtime
wget https://dot.net/v1/dotnet-install.sh -O dotnet-install.sh
chmod +x dotnet-install.sh
sudo ./dotnet-install.sh --version latest --runtime aspnetcore --install-dir /usr/share/dotnet
after that we have to set up a folder where our app will be copied to
mkdir ~/my-dotnet-app2. Setting up New Project with Rider on your computer
For details see Debug Remote Applications via SSH – JetBrains Documentation
- Create new project in Rider (For example a new Empty Web Application with net10.0)
- Open Settings (CTRL + ALT + S)
- go to Build, Execution, Deployment | Deployment
- Click + and click SFTP and set a name.
- Click on … at SSH configuration and add new SSH configurations with the same ssh credentials you used in the previous step
- For root path choose
/home/arduino/my-dotnet-app(we created that folder in the step before) - add run/debug configuration
- In Menu Click Run > Edit Configurations
- Click on + and add new Publish to custom server configuration
- Choose name
publish-to-arduino - Select your arduino at Remote server
- Target Framework: net10.0
- Deployment mode: Framework-Dependent
- Target Runtime: linux-arm64
- Click OK to save
- Edit your csproj and add in
PropertyGroup
<PropertyGroup>
    <RuntimeIdentifiers>linux-arm64</RuntimeIdentifiers>
</PropertyGroup>
3. Start Developing
- Add NuGet Package
dotnet add package Reble.ArduinoRouter - Start hacking by following the documentation
Example
Switch to your Arduino App Lab and run the Blink LED with UI example.
Then replace your Program.cs with this
using Reble.ArduinoRouter;

var builder = WebApplication.CreateBuilder(args);
builder.Services.AddSingleton<IArduinoRouterClient, ArduinoRouterClient>();

var app = builder.Build();

bool ledState = false;
app.MapGet("/toggle", async (IArduinoRouterClient client) =>
{
    ledState = !ledState;
    await client.CallAsync("set_led_state", [ledState]);
});

app.Run();
and click on Run. This will compile, publish and transfer this app to your arduino via ssh. Now connect to your arduino via ssh:
ssh arduino@<boardname>.local
cd ~/my-dotnet-app
chmod +x WebApplication1 # replace WebApplication1 with your application name
ASPNETCORE_URLS="http://0.0.0.0:5000" ./WebApplication1
and go on your PC to this address: http://<boardname>.local:5000/toggle. Everytime you go on this link, the LED on the board will toggle! 🙂
Wrap-up and Future Plans
That’s it. Now you can make use of the Arduino Bridge to call with the microcontroller directly from dotnet. Please let me know if everything has worked for you, if you find this useful, if you have wishes for future versions and on which projects you use this library. Please use the GitHub discussions of my repository for this.
For the future I may like to take a deeper look into nanoframework or dotnet IoT to not only hijack the UNO Q’s MPU but also its MCU.
Thanks for reading,
yours Max